Create a Custom Repeating Border in BoardCraft
Turn one image—or a sequence of several images and shapes—into an editable border that repeats around your classroom board.
BoardCraft’s Create Border command builds a decorative border from elements already on the canvas. It turns the selection into one border element and repeats its tile sequence on the top, right, bottom, and left sides of the board.
1. Choose the right kind of border
BoardCraft has two different border tools. Choose based on the result you want:
Border type | Use it for | How to create it | What you can edit |
|---|---|---|---|
Decorative repeating border | Clipart, shapes, themed motifs, or alternating tile sequences | Select canvas elements, then choose Create Border | Sides, opacity, tile width, edge distance, spacing, shift, and tile sequence |
Solid board outline |
2. Build the repeating motif
Start by placing the source artwork somewhere on the canvas. A border can be made from one or more eligible elements:
BoardCraft clipart or another image
Your own uploaded image
A supported shape
A group containing several elements
Text, existing banners, and existing borders cannot be nested into a new border. Hidden or locked elements are also unavailable until you show or unlock them.
One tile or a sequence?
Select one element to repeat the same motif around the board.
Select several elements to create an alternating sequence.
Group several elements first when you want the entire composition to act as one repeating tile.
3. Select the elements and create the border
Select the first source element on the canvas.
Hold Shift and select the remaining elements, or use the Layers panel to build the selection.
Confirm that the selection contains only eligible, unlocked, visible images, shapes, or groups.
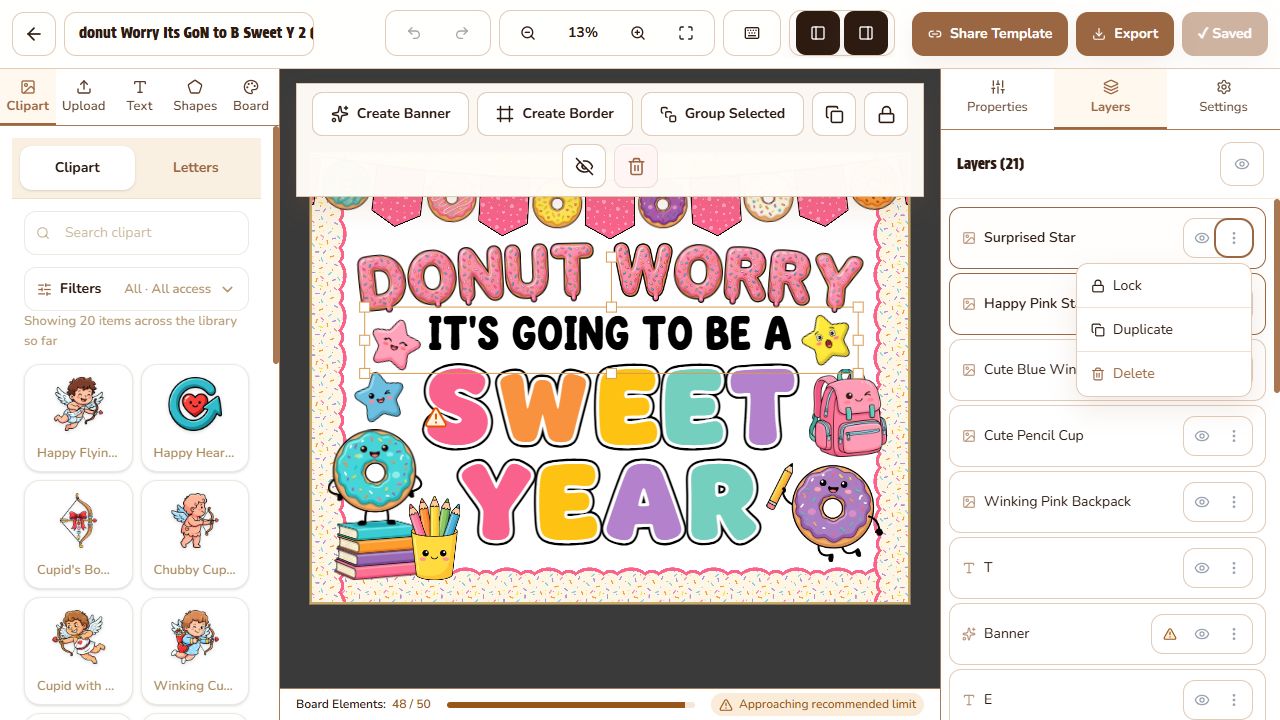
Choose Create Border in the selection toolbar.
BoardCraft replaces the source selection with one border element and repeats the sequence on all four sides.
4. Choose which sides appear
Select the finished border and open Properties. Under Apply to sides, use the four side buttons to control the top, right, bottom, and left edges independently.
Full frame
Leave all four sides active for a complete border around the board.
Top and bottom
Turn off the left and right sides for a banner-like classroom display.
Single garland
Keep only the top side active for a decorative header.
Side rails
Keep the left and right sides active for a tall poster or door display.
At least one side must stay active. If you want the entire border temporarily out of view, hide the border element instead of trying to turn off its last side.
5. Fine-tune the border in Properties
The border’s Basics section contains the controls that shape the repeated layout:
Control | What it changes | Useful for |
|---|---|---|
Opacity | Makes the whole border more transparent or more solid. | Creating a subtle frame behind important text. |
Tile width | Changes how much horizontal or vertical space each repeating tile occupies along an edge. | Showing fewer large motifs or more small motifs. |
How to tune efficiently
Choose the active sides first.
Adjust Tile width until the motif feels proportional to the board.
Use Distance from edge to establish the frame position.
Use Tile spacing to control visual density.
Finish with Tile shift to improve corner alignment.
6. Edit the tile sequence later
Select the border and choose Edit Tiles in the selection toolbar. The tile editor lets you:
Reorder the repeating sequence
Edit an individual tile’s appearance
Replace a tile with another asset
Remove extra tiles
Add another tile from the canvas or asset library
This is useful when the layout is correct but you want to refresh the theme. For example, replace every second star with a pencil without rebuilding the border from the beginning.
7. Undo or convert the border back
You are not trapped after creating a border:
Use Undo immediately if the new border is not what you expected.
Select the border and choose Convert Back to restore its source tiles as regular canvas elements.
Convert Back is especially helpful when you need to resize the source artwork, change the motif composition, or rebuild the sequence in a different left-to-right order.
Border design recipes
Alternating clipart
Place two or three themed images from left to right, select them together, and create the border. Increase spacing if the sequence feels busy.
Shape confetti
Combine circles, stars, or other supported shapes in different colors. Keep the tiles small and spacing moderate.
Composite classroom motif
Group a small clipart item with a shape behind it, then create the border from that single group.
Top-only header
Create the border, keep only the top side, then adjust shift until the central motif aligns with the heading.
8. Prepare the border for printing
Keep important text and faces away from border tiles that overlap the content area.
Check all corners at the intended board size.
Use Fit to screen for the overall rhythm, then zoom in to inspect individual tiles.
Confirm the intended sides are active.
Use Export for Printing when you need BoardCraft to prepare the repeated border pieces for assembly.
Print a small test section before producing the complete classroom set.
Troubleshooting
Create Border does not appear
Select at least one eligible image, clipart item, supported shape, or group. The command is unavailable for text, existing banners, existing borders, hidden elements, and locked elements.
The sequence repeats in the wrong order
Choose Convert Back, arrange the source items from left to right in the order you want, select them again, and recreate the border. You can also reorder the sequence with Edit Tiles.
The border is too crowded
Increase Tile spacing first. If you want fewer repeated motifs, increase Tile width; if the sequence itself is too busy, remove some items with Edit Tiles.
The border covers the board content
Reduce Distance from edge—or use a negative value—to move the border outward. You can also reduce visual density or disable the sides that interfere with the design.
The corners look uneven
Adjust Tile shift after setting the final tile width and spacing. Small shift changes often improve where motifs meet the corners.